I am really happy with the tights pattern I made for the girls, I wanted to share how it did so you can do it too!
When you are ready to make a pair of tights, make sure the material you pick is stretch. Stretch both ways (across and up and down) is best, but I used a stretch knit that only stretched sideways and it worked just dandy..
How To..
- You will need and old pair of tights (roughly the size that you are wanting to make)
- Lay them inside out on a flat surface and cut up the inside of one leg and cut all the way around to the bottom of the other leg (see below)
- Now cut the groin seam (see below)
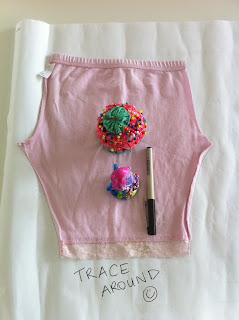
- Take one piece of your tights and open it out and lay it on some paper to trace the outside (see below)
- There is a slight angle of the waist as this makes the back (higher end) and the front (lower end)
- When you trace your pattern, add about 2-3" to the top as this will be the allowance for the waist
- Try and put markings where 3/4 length would be and full length etc
- When I cut out the paper pattern, I left about a 1/2" allowance around the pattern just incase, cause you can always take things in but not out! (see below)
- Pin you pattern on to your folded right side facing stretch material and cut around (see below)
- Below is what it looks like when you have cut it out (bad light in picture I know)
- Pin the right side and left short (crutch) seams together (see below) and sew (I used an over locker but you can use a normal stitch on a sewing machine. Maybe think about using a jersey needle)
- Pull pants open so that the opposite groin points meet
- Pin the inner leg seam together matching the groin together first and sew
- Turn right side out now so you can check your work out!! See below
- Turn inside out and turn top edge to make elastic waist (I over locked the edge but you don't have to as most stretch material doesn't fray)
- Pin and sew leaving a 2" gap at the back middle seam to thread your elastic through, see below
- Make sure the width of your elastic you use is the approx width of your turn
- Use a safety pin at the end of your elastic so you can easily feed it through your little tunnel your just made
- Feed it all the way through to the other end (making sure you don't let the other end of elastic go through and disappear)
- Safety pin it together and double check the right waist size for elastic with your child an sew elastic together
- Now you can close up gap and your waist band is done! (see below)
- Hem the bottom of your tights
- Your done!
This is a pair that I had mad the other week and I have made 3 pairs since. Once you have your pattern worked out, and there may be some small alterations once you make your first pair, these tights seriously take less than 20 mins to make!
There is another way of making your own pattern with out having to cut up anything... I will show you that soon.
I'm certainly no expert on this whole sewing thing, but I just give it a go the only way I know how, and most of the time it works. Feel free to leave me some tips or corrections if you think it might help me and other sewers :)


No comments:
Post a Comment