Sunday, January 30, 2011

I can't think of a title?

I had to finish off our little present for Will this morning. He is 6. Along with the super easy library bag I made, I made this peek-a-boo toy sack. I found the tutorial here. I plan on making about 4 of these bags for Mitchies room and hang them on some little hooks. Fabric bought from Peg's Pieces.


Before the party Bonnie painted every ones nails. Heaths too! Hmmmmm, will he remember before going to work tomorrow??


This is Mitchie at the party today wearing his new t-shirt I made him. It was a scorcher of a day today, so lucky it was a pool party and the kids swam all afternoon. And for some strange reason I nearly fell asleep on the floor laying face down on their bean bag .... hmmmm, I wonder if that had anything to do with my recent late, very late nights?? The sewing machine might have the night off tonight. But I can't wait for tomorrow for Mitch to wear another t-shirt I have made.

my mitchie xx

And I just couldn't help myself in showing you the delicious dessert I made for our good friends last night. Hot Chocolate Baklava with Vanilla Cream.... recipe by George Calombaris in the FEB/MAR Issue of Donna Hay magazine.Totally scrummo!


To all the mums and dads that have their babies starting school tomorrow for the first time, big hugs and smooches to ya all!! Lace has her little meeting with her teacher tomorrow, so the uniform is hanging on the door, shoes are shinny... NOT, due to her wearing them everyday for the past 3 weeks, we have matching white socks which is very rare in our house, the giant school backpack is basically empty as only has her hat which I am sure she will wear as soon as she wakes, and her green monkey bar knickers are ready too.
I pictured having warm cuddles and telling Lacie stories of what she was like as a baby and how big she is now to be going to school, and how wonderful it will be to have her very own teacher etc etc.... Well that sure as hell didn't happen. She decided that she HAD to cut out a felt tie for herself and sew it on a dress up shirt right on bedtime! Clearly telling her "no I don't think so" didn't go down too well, so it was straight to bed with no story and no cuddles. I think I was more upset. But as cleaver as BOTH my angels are they came up with a plan between them both that they were too hot and needed a cool shower! So yes, we all hopped into the shower and another half and hour passed by... BED TIME PLEASE!!!!! Cheeky things.

Until the next time we meet x

Saturday, January 29, 2011

"the list"

My brain is going to explode! It is absolutely overloaded with stuff I want to make and ideas I want to try. I have been up to the wee hours of the mornings lately just trying to get through "the list" in my brain. There is something about a list. It's 100% mine and it is 100% up to me to complete. I love a list. I wrote down my list of things to do the other day and showed my Mother-in-law, and she had a little giggle that I wrote down vacuum, wash up etc... amongst other things of cause, like take Mitch to the doctors, get refund on trundle bed, get brake lights fixed etc... But I need a list. Getting through "the list" is like my own personal achievement for the day. My own pat on the back kind of thing. Just like when I make stuff, it's a personal satisfaction that I get from just me. It's getting a bit overwhelming at the moment with my make stuff list. It's growing and growing and growing and I can't stop it.

Anyways, the other day I make a patchwork library bag for Lacies little friend. Well she loved it. Yay!

Now, my latest crafty craze (well the last 24hr craze that is) is stuff for BOYS!!!!!!!!!!!! Where is all the stuff to make for boys???? Well, we have a little boys party tomorrow that I have already make the super quick library bag for, but I also have a great little Peek-a-Boo pouch that is just about finished too. Will show you tomorrow. It's been nice checking out boys material! So keeping with my little boy theme, my little Mitchie needed something just for him. So, I got a few of his plain coloured t-shirts and made these..... (this idea came to me at 11.45pm last night, and I just had to make 3 of them, hence my very late night - cause that's when babies sleep!!)


I am soooooooooooooo happy with them!!!! Just LOVE them. I have already been out today to buys some more to make! Yes of course my Mitchie was wearing one of his new tops!!.. Totally GROOVY I reckon! I will be selling these soon cause I reckon really little boys (from newborn to 1yrs) miss out a bit with groovy fun hand made stuff to wear. Let me know if you are interested in buying any. Leave me a comment on this post or email me at sarahbowling@live.com.au

OK, so another tick off my "list", is hand made lables by me! Can you see them on the bottom right hand side of the t-shirts????? It really makes them look like a "for real" label!! Ha ha, but it's just little old me! So, the name freddles comes from a teddy bear that I still to this day sleep with. I love him and I am not embarrassed to say so! I'm a bit proud of myself actually, these labels look exactly how I planned. So you will now start seeing these labels on my creations from now on. All I did was check out if my printer would print direct on to fabric????? Well, it did! I ironed on some light weight interfacing and fed it straight through. Then used my Mumma's old fashioned pinking shears for the edge. Easy peezy!!! A close up for you below..

I'm totally into these!

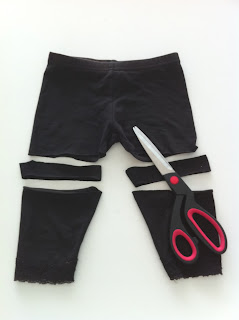
Moving right along.... The girls have loads of tights and they are now starting to get very marked and warn at the knees, some have paint on them etc etc... So don't bin them. Cut them! I didn't even sew a hem or anything. Hey, let them cut them themselves! Maybe??


As promised to my kiddie-winks, pancakes was on the menu for this morning. Prepared by Miss Bonnie Doon we tried a new thicker fluffy recipe. The verdict was that our thin crape pancakes are way better.


check out my GIANT pancake flipper! an awesome present from my dad!!

Lucky that Bon checked the hen house this morning as we had loads of eggs. We also had a surprise visit from the kids Uncle Shoo Shoo and Aunt Beth. I had no bread or cold meat for lunch, so thanks again to the chooks we had enough eggs for a fritata.

lunch today
I still have soo much to say, but I think it is time for some sleeeeep. We just had a beautiful dinner with our friends at our place and woooo hoooo my home made dessert was a hit! Hot Chocolate Baklava with Vanilla Cream. One from the current Donna Hay mag.

Friday, January 28, 2011

super easy library bag tutorial

Another birthday party, another present to make. This time for a 6yr old boy. Thought I'd do a quick, super easy, beginner style library bag, and of course a tutorial for you to be able to do the same for someone too! Fabric from my fav fabric store Peg's.

Supplies
  • Material of your choice (I bought 50cm of quilters cotton fabric which is about 112cm long)
    • cut 2 x (13.5"L x 16"W) bag part
    • cut 2 x (17" x 4.5") straps
  • Sewing Machine & Thread
  • Tape Measure
  • Sewing Scissors
  • this photo was suppose to be sideways, oh well
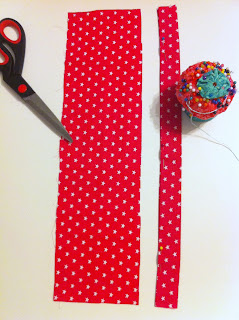
    the 2 straps are on the top
    the bag part is below straps, with the 2 pieces facing each other and pinned
  • With right sides facing each other, pin down both sides and bottom of rectangle, make sure you check the print / pattern is not upside down
  • Sew along long side edges and bottom to create the bag / pouch
  • Iron sides seems flat / open (you can see in the below picture)
  • Keeping bag inside out, turn over the raw edge opening by approx 1cm and press with iron, turn another 1cm, press with iron and pin
  • Sew all the way around as per below, now it's all nice a neat
  • Now for the the straps.. take one of the 17" x 4.5" pieces you have already cut and iron both the raw shorter ends over by about 1cm (this will keep your straps nice and neat) then iron in half length ways, then fold long sides to touch the middle fold and iron (see below picture) then fold in half again and iron and pin

  •  Top stitch 2/8" from edges
  • Repeat for 2nd strap, see below example


  • Measure 3.5" in from one top end corner and pin bottom end of strap 1"down from top edge of bag opening, see below picture
  • Do the same for the 2 straps
  • Sew a 1" box then a cross in the box to secure straps in place, see below

  
Your done, and you made it!

Feel free to leave any of your tips for library bags or comments on this tutorial. I would love to hear from you.

Now go make!

the fringe is back!

Yep, that's right! After a year or so of growing the kidlets fringes out, I have decided I want them back. Of course after consultation with the monsters, I mean beautiful angels.. they agreed!
It was a little excursion that even the girls Mumma couldn't miss. As hairdresser Denise cut Lacie's brown locks, I swept them up and wrapped them to keep for ever & ever as my Pa did for me. Lacie's big brown eyes nearly popped out of her head when the big reveal happened. Then she put on a concert in the salon with her new look! I should have warned them.. So then, we had to wake Miss Bonnie Doon for her turn in the chair. It's always a little nerve racking disturbing The Doon (Bon) as you never know what to expect. In then end she was happy for her turn, even if she nearly fell asleep in the chair (sitting on my lap). Our little Mitchie-bite sat happy steeling and eating the girls sandwich and playing with his favourite toy snake. The photos below clearly show that sisters just have something soooo special that I will never know. They just couldn't believe how different each other looked.


And right this very second as I am blogging away, the kids have put the iPod on the dock and are pumping out Neil Diamond's, Crunchy Granola Suite! De, de, de, de, de, de, de, de, de, de, de, de, de, de, de...

Thursday, January 27, 2011

Library Bag Tutorial

* Library Bag Tutorial * Library Bag Tutorial * Library Bag Tutorial *


Ok, so I have a million photos to go with this Library Bag Tutorial, so I hope it helps.
I seriously love my scrap bag of material and love making something from nothing. Lacie has her little friends 6th birthday party tomorrow and she is starting school this year. Due to my "hand made 2011", the deal I have made with myself, I need to make a present. A Library Bag is PERFECT! 

Supplies
  • Material of your choice (scraps for patchwork option)
    • 2 x (13.5"W x 16"L) outer
    • 2 x (13.5"W x 16"L) inner lining
    • 2 x (17" x 4.5") straps
    • Quilted Fabric - optional if you want the padded kind of look (not floppy) there is a picture of what I am talking about a little down the page
  • Sewing Machine & Thread
  • Tape Measure
  • Sewing Scissors
  • Assume an approx 1cm seam allowance

Hmmm.. I wonder what the kids and I will pick??
  •  Get your scraps in some sort of order so you can visualise what you want, and roughly work on 2 x (13.5"W x 16"L) see below example

x 2
  • Once you're happy with what you have designed, pin right sides together and sew an approx 1cm seam allowance straight down 
  •  Get your next piece and again, right sides together, pin and sew

and so on, until all sewn together
  • Get the iron out and press seams open on the back, this will make sure you have a flat finish on the front
  • Measure and trim your 2 pieces to 13.5"W x 16"L
  •  If you want the padded quilted look, cut 2 x (13.5"W x 16"L) see below example
  •  Place your patchwork piece on top of quilted fabric and pin along the stitched lines
  •  Sew down each seam, this will secure quilted fabric and patchwork pieces together and also give it the quilted look

are you with me??? great, if not email me
  •  Get creative and add stuff to the bag, a letter, a button, some lace, some yoyo thingies, a pocket etc etc etc....
  •  I hand sewed this letter on and I think it looks way better then sewing it on as I would normally do

2 pieces so far
  • Cut 2 x (13"W x 16"L) see below example for lining
  • Pin together and sew both sides and bottom together leaving the top open
  •  Get your 2 outer pieces and iron over top raw edge by approx 1cm to the wrong side
  •  Pin these pieces right side together and sew down both sides and bottom to create an inside out pouch
  •  Turn it right side out, see below
  •  Take your lining and iron top raw edge over by approx 1cm to the wrong side
  • Place lining inside your quilted pouch wrong sides touching, and the opening on both are aligned and pin together, see below 
  •  Cut 2 (17"L x 4.5"W) for straps
  • Take one piece and iron in half length was, then open again and fold raw long edges to meet the middle crease you had just ironed, repeat with the other raw side so that both raw long edges are now touching, now fold this in half so there are no raw edges showing and you now have a strap, see below right for an example and what it should look like (hope that wasn't confusing!)
  •  Pin straps and top stitch down both sides, see below
  •  Measure 3.5" in from both ends and place strap ends inside the lining and outer pieces to sandwich straps in and insert approx 1", pin in place and repeat with both straps, see below
Woo hoo, we are just about there!!
  •  Top stitch approx 2/8" in from top edge to secure the lining, the outer and the straps into place, see below
  •  Yay, best part, your done!


You could use these measurements to make a very simple library bag with plain material, no patchwork and no quilting etc.. Now that I have finished it, it is actually a really nice little bag and could even be a bit too nice for a library bag!

Leave me a comment on my blog below if this has helped you is any way, as I would love to do more of these if people are interested.

Happy making x